多线程编程
基础知识概念
进程+线程
简单理解: - 进程(process):任务 - 线程(thread):子任务
对比性能: - 创建进程比创建线程开销大 - 进程间通信比线程间通信要慢,因为线程间通信就是读写同一个变量,速度很快 - 多进程稳定性比多线程高
多任务程序的模式
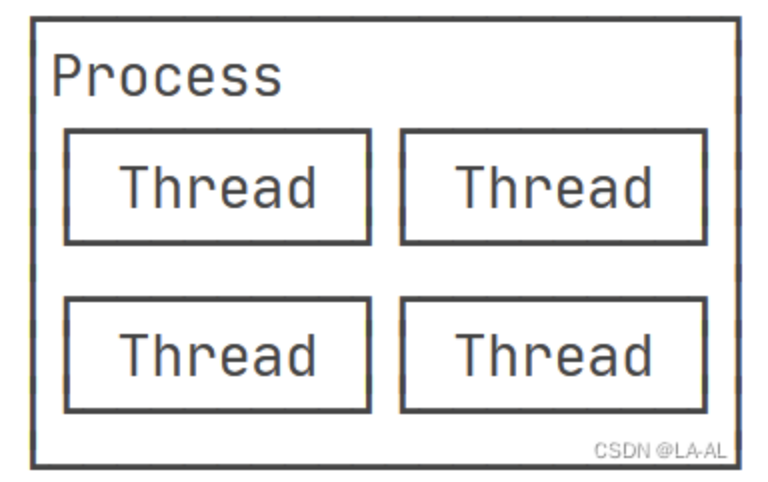
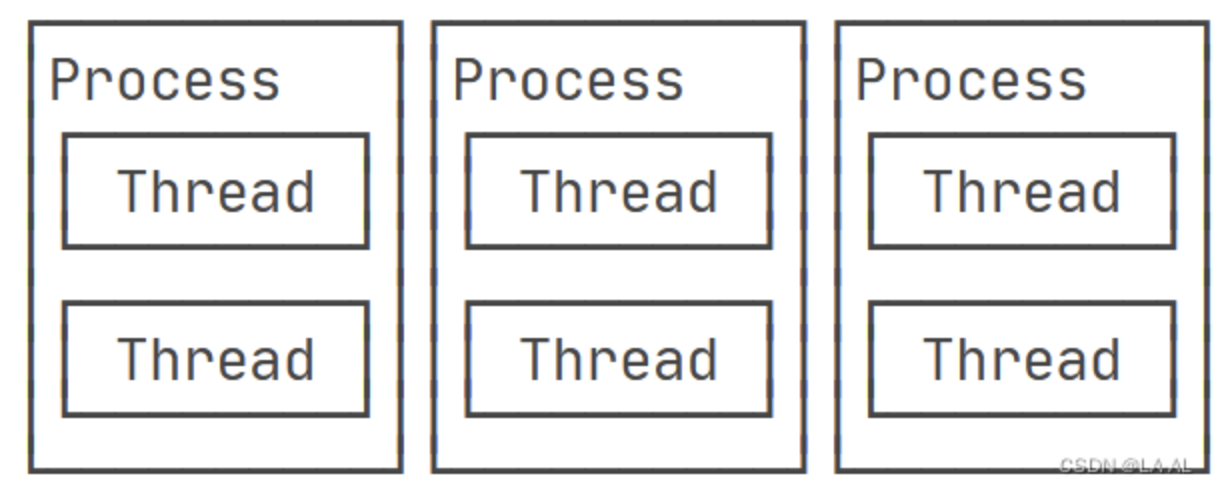
多进程模式(每个进程只有一个线程)

多线程模式(每个进程有多个线程)
多进程+多线程模式
java多线程编程基础
创建线程
Java语言内置了多线程支持。 当Java程序启动的时候,实际上是启动了一个JVM进程,然后,JVM启动主线程来执行main()方法。 在main()方法中,又可以启动其他线程
步骤
- 实例化一个Thread对象,其run需要定义:
- 方式1:自定义MyThread继承Thread,覆写run
- 方式2:创建Thread实例时,传入一个Runnable实例
- 方式3:lambda语法
- 调用对象start方法,而不是run(不会产生新的线程)
例子
1 | |
线程的优先级
- 操作系统对高优先级线程可能调度更频繁,但我们决不能通过设置优先级来确保高优先级的线程一定会先执行
Thread.setPriority(int n) // 1~10, 增大默认值5
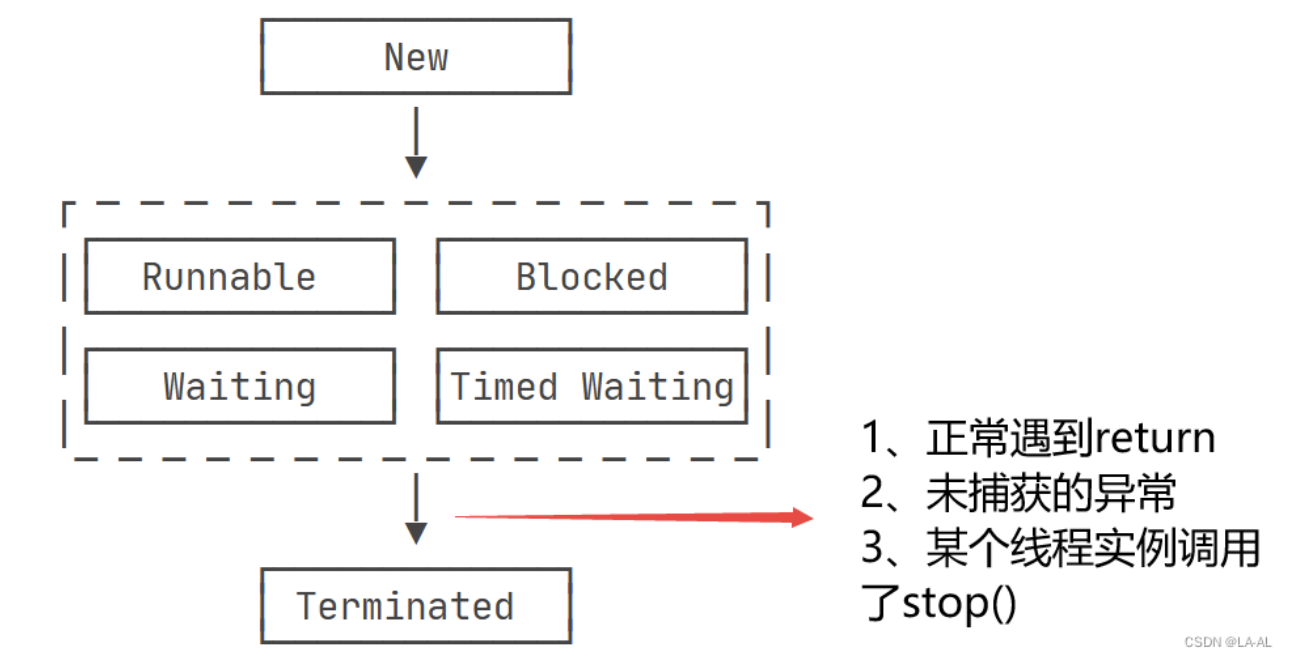
线程的状态
状态类型
- New:新创建的线程,尚未执行;
- Runnable:运行中的线程,正在执行run()方法的Java代码;
- Blocked:运行中的线程,因为某些操作被阻塞而挂起;
- Waiting:运行中的线程,因为某些操作在等待中;
- Timed Waiting:运行中的线程,因为执行sleep()方法正在计时等待;
- Terminated:线程已终止,因为run()方法执行完毕。
状态间的转移
- 不建议使用stop()函数进行强制的结束
不同线程的交互
1、join:等待某个线程结束后再执行
void join() Waits for this thread to die. void join(long millis) Waits at most millis milliseconds for this thread to die. void join(long millis, int nanos) Waits at most millis milliseconds plus nanos nanoseconds for this thread to die.
- 一个线程还可以等待另一个线程直到其运行结束。
- 可以指定等待时间,超过等待时间线程仍然没有结束就不再等待;
- 例如,main线程在启动t线程后,可以通过t.join()等待t线程结束后再继续运行:
1 | |
2、中断线程
方式1:interrupt()
void interrupt() Interrupts this thread. static boolean interrupted() Tests whether the current thread has been interrupted.
- 在其他线程中对目标线程调用interrupt()方法
- 目标线程需要反复检测自身状态是否是interrupted状态,如果是,就立刻结束运行
- interrupt()方法仅仅向t线程发出了“中断请求”,至于响应要看t的具体实现
- 对于调用
join()处于等待其他线程状态的某线程,如果突然自己被interrupt()中断,join()会弹出InterruptedException,所以要及时处理,并停下
1 | |
方式2:running=false
注意点: - 线程中要用 volatile
标记boolean running,因为这是一个线程间共享的变量,原因如下:
-
在Java虚拟机中,变量的值保存在主内存中,但是,当线程访问变量时,它会先获取一个副本,并保存在自己的工作内存中。
- 如果线程修改了变量的值,虚拟机会在某个时刻把修改后的值回写到主内存 -
volatile关键字的目的是告诉虚拟机: -
每次访问变量时,总是获取主内存的最新值; -
每次修改变量后,立刻回写到主内存。 -
volatile关键字解决的是可见性问题:当一个线程修改了某个共享变量的值,其他线程能够
立刻看到 修改后的值。
1 | |
3、守护线程(Daemon Thread)
void setDaemon(boolean on) Marks this thread as either a daemon thread or a user thread. The Java Virtual Machine exits when the only threads running are all daemon threads. This method must be invoked before the thread is started.
- 如果有一个线程没有退出,JVM进程就不会退出。所以,必须保证所有线程都能及时结束
- 但是有些线程本身就是不会结束的,例如:Java垃圾回收线程就是一个典型的守护线程
- 守护线程是为其他线程服务的线程;
- 所有非守护线程都执行完毕后,虚拟机退出,即不等待守护线程
- 守护线程不能持有需要关闭的资源(如打开文件等)
1 | |
4、线程同步
多线程要解决一个重要问题:数据的一致性

- 这种加锁和解锁之间的代码块我们称之为临界区(Critical Section)
- 效果:任何时候临界区最多只有一个线程能执行
- 步骤:如何使用synchronized:
- 找出修改共享变量的线程代码块;
- 选择一个共享实例作为锁;
- 使用synchronized(lockObject) { ... }。
- 注意:
- 加锁、解锁会降低程序效率,所以仅在有数据一致性差异的地方加锁,可以并发的部分不用加
- 在使用synchronized的时候,不必担心抛出异常。因为无论是否有异常,都会在synchronized结束处正确释放锁
- volatile和synchronized的区别:概括就是volatile可以实现可见性,但是无法实现原子性,syn都可以。
- java原子性介绍:自带原子性的操作不需要用synchronized
synchronized例子
1 | |
5、线程安全的类
如果一个类被设计为允许多线程正确访问,我们就说这个类就是“线程安全”的(thread-safe)
定义一个线程安全的类
1 | |
- 这样一来,线程调用add()、dec()方法时,它不必关心同步逻辑,因为synchronized代码块在add()、dec()方法内部。
- 并且,我们注意到,synchronized 锁住的对象是this ,即当前实例,这又使得创建多个Counter实例的时候,它们 之间互不影响 ,可以并发执行
java中线程安全的类
- Java标准库的java.lang.StringBuffer
- 一些不变类,例如String,Integer,LocalDate,它们的所有成员变量都是final,多线程同时访问时只能读不能写,这些不变类也是线程安全的
- 类似Math这些只提供静态方法,没有成员变量的类,也是线程安全的
大部分类,例如ArrayList,都是非线程安全的类,我们不能在多线程中修改它们。但是,如果所有线程都只读取,不写入,那么ArrayList是可以安全地在线程间共享的。
synchronized位置与修饰的目标
1 | |
6、死锁
可重入锁
- JVM允许同一个线程重复获取同一个锁,这种能被同一个线程反复获取的锁,就叫做可重入锁
- 例如下面的例子,add里面调用dec,就是再次获取当前实例的this锁。
- 原理:获取锁的时候,会判断是否是第一次获取,同时记录这是第几次获取。每获取一次锁,记录+1,每退出synchronized块,记录-1,减到0的时候,才会真正释放锁。
1
2
3
4
5
6
7
8
9
10
11
12
13
14
15public class Counter {
private int count = 0;
public synchronized void add(int n) {
if (n < 0) {
dec(-n);
} else {
count += n;
}
}
public synchronized void dec(int n) {
count += n;
}
}
死锁的例子
1 | |
- 上面的代码中,add和dec可能会互相等待对方的锁
- 修改方式,将dec中的lockB和lockA交换
7、多线程协调方式
**synchronized + wait*
Reentrantlock + Condition
ReadWriteLock、StampedLock
Semaphore
Concurrent集合
Atomic
线程池
8、Future:结果的返回
9、Forkjoin:任务的拆解
10、ThreadLocal: 线程内的上下文
场景案例
1、一个线程等待多个并发的线程
可选的方案
- 使用 thread.join () 方法,让主线程等待子线程的终止。也就是说主线程的代码块中,如果碰到了 t.join () 方法,此时主线程需要等待(阻塞),等待子线程结束了,才能继续执行 t.join () 之后的代码块。
- 使用 CountDownLatch 类,这个类使一个线程等待其他线程各自执行完毕后再执行。是通过一个计数器来实现的,计数器的初始值是线程的数量。每当一个线程执行完毕后,计数器的值就 -1,当计数器的值为 0 时,表示所有线程都执行完毕,然后在闭锁上等待的线程就可以恢复工作了。
- 使用 CyclicBarrier 类,这个类使一组线程相互等待到达一个公共屏障点。在CyclicBarrier类的内部有一个计数器,每个线程在到达屏障点的时候都会调用 await () 方法将自己阻塞,此时计数器会减 1,当计数器减为 0 的时候所有因调用 await () 方法而被阻塞的线程将被唤醒。
- 区分CountDownLatch和CyclicBarrier:一句话概括就是前者是1个线程等待多个线程结束再开始,后者是多个线程相互等待到齐了再并发开始
例子:采取CountDownLatch + join
场景描述
- 用于将DAG(如下图)的不同节点创建线程,并用DAG的边关系协调线程关系
- 有一个主线程,要在所有子线程开始前做一些准备工作
- 子线程之间的依赖关系可以建模为DAG图
- 子线程完成工作后,主线程做一些收尾工作
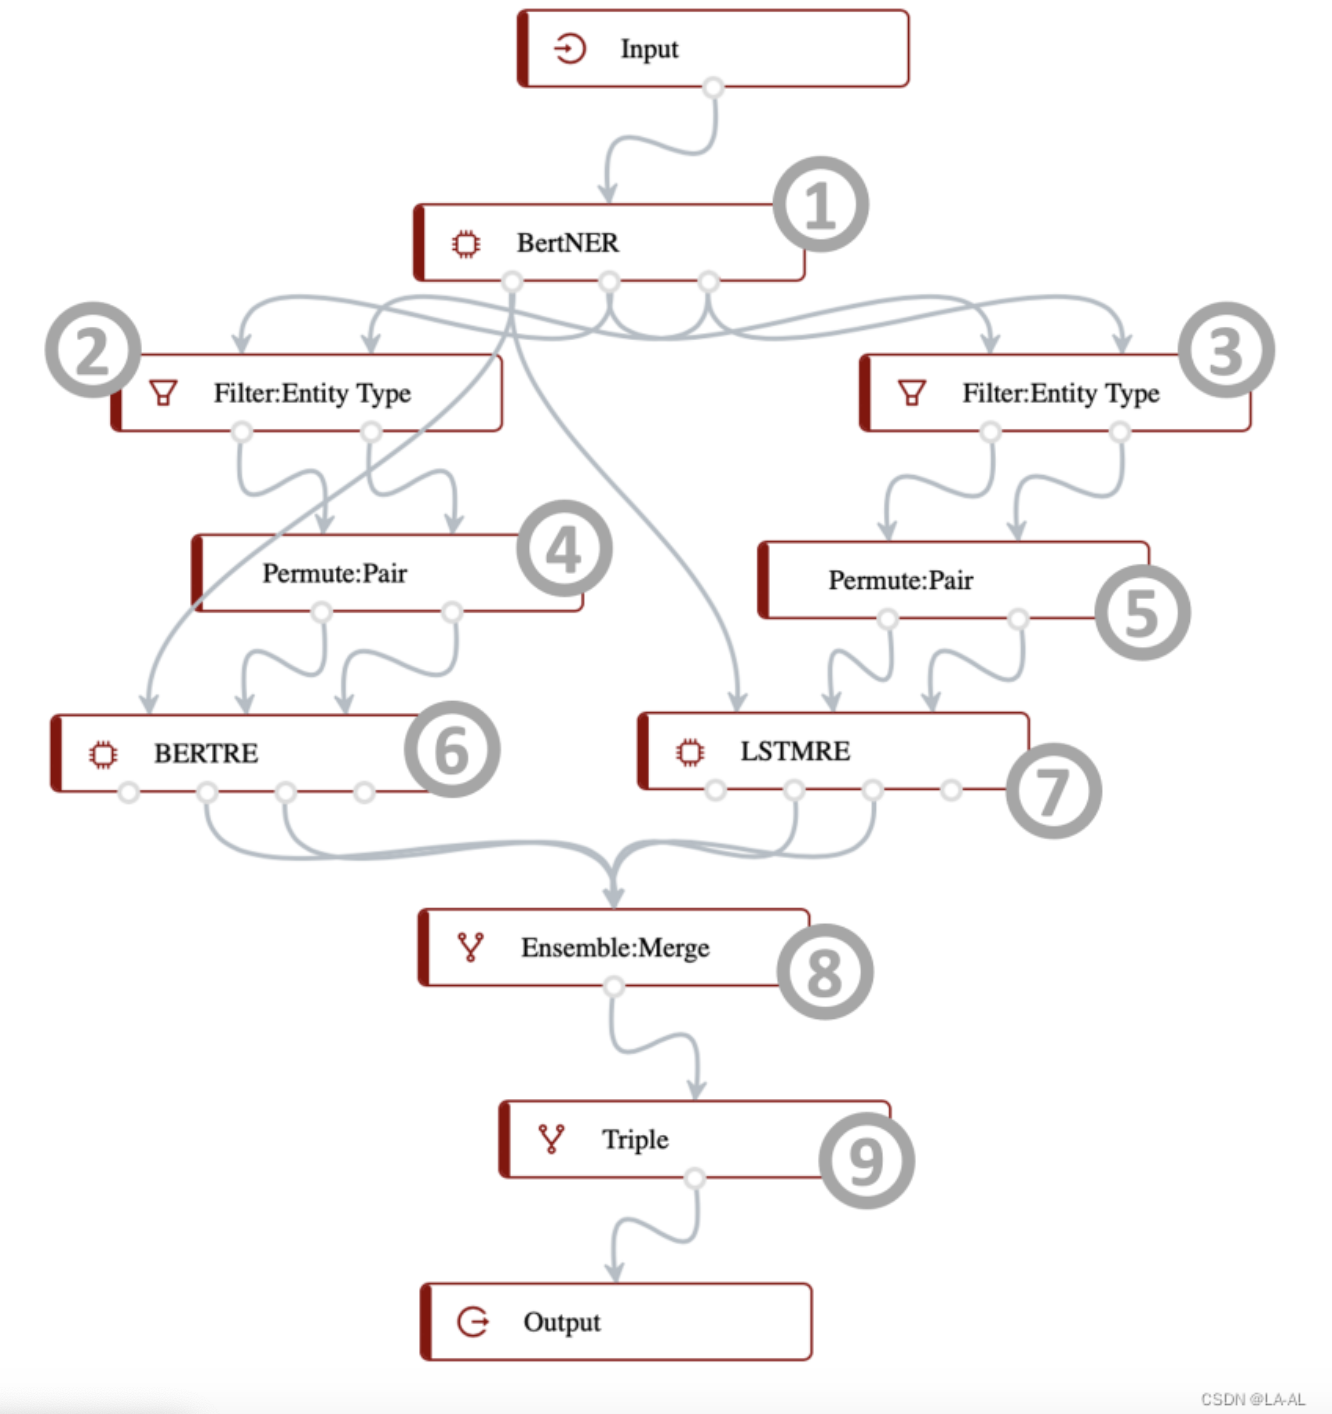
说明:
- CountDownLatch用于主线程
- join用于给子线程做一个先后关系的(DAG的有向边)
代码(片段)
1、Scheduler(主线程) 1
2
3
4
5
6
7
8
9
10
11
12
13
14
15
16
17
18
19
20
21
22
23
24
25
26
27
28
29
30
31
32
33
34
35
36
37
38
39
40
41
42
43
44public class Scheduler{
public void arrange(DAG dag) throws InterruptedException {
ArrayList<Node> nodes = dag.getNodes();
ArrayList<Edge> edges = dag.getEdges();
CountDownLatch startSignal = new CountDownLatch(1);
CountDownLatch doneSignal = new CountDownLatch(nodes.size());
// 便于后面添加线程之间的先后关系
ArrayList<WorkerThread> threads = new ArrayList<>();
// node的id对应的Thread
HashMap<Integer,WorkerThread> mit = new HashMap<>();
for(int i = 0;i < nodes.size();i++)
{
WorkerThread tp = ThreadStore.createThread(startSignal,doneSignal,nodes.get(i));
tp.start();
// 将id和thread映射
mit.put(nodes.get(i).getId(),tp);
threads.add(tp);
}
// 准备工作
System.out.println("Preparing something for the process of DAG...");
Thread.sleep(1000);
// 在这里把对应的Thread之间加一些关系
for(Edge edge:edges)
{
// 添加前置关系
mit.get(edge.getTarget()).addFormer(mit.get(edge.getSource()));
}
// 所有没有前置的线程可以开始了
startSignal.countDown();
// 等所有的线程都完成了
doneSignal.await();
// 收尾工作
System.out.println("Finish the whole DAG.");
}
public static void main(String[] args) throws InterruptedException {
Scheduler sc = new Scheduler();
// ? Json2G的具体类型待定,此处简单模拟
DAG dag = new DAG(Json2G.extractNodes(),Json2G.extractEdges());
// execute the DAG
sc.arrange(dag);
}
}
1 | |
Reference
[1] java-廖雪峰
[2] CSDN